
![]()
Mobility Screen
Bradke sets up with a “S” posture and is considered “loose”. During the pelvic tilt test, Bradke showed vibration which indicates an imbalance between his lower back and abdominal muscles. This should be a primary focus on his functional strength plan. For example, implementing a dead bug variation and/or superman series in his movement prep will help improve his range of motion. In turn, this will help with maintaining athletic posture in his swing. Bradke was limited in the pelvic disassociation screen but passed the torso test. This shows he needs to work on separating his pelvis and torso. Our PVC progression will help improve the range of motion.
Bradke passed the overhead squat test. His hamstrings were within expectation as he was able to touch his toes without bending his knees. He is on the loose end of thoracic mobility; actively turned 85 degrees to his right and 80 degrees to his left. Because he is on the loose end of thoracic mobility it will take longer for Bradke to take the slack out of his body. He created 50 degrees of thoracic side bend on both sides. This screen shows he is capable of having adequate side bend at contact. In the scapular retraction test he pulled around 1.5 inches. This test shows he won’t need a big scap load. During the scapular palpation test, we were able get fingertips underneath his scapula. This indicates the muscle underneath his shoulder blade is underdeveloped. In order to maintain a scap load, Bradke will have to strengthen this area. Scapular strength is delicate and should be consistently targeted in his workout routine. Once Bradke strengthens this area he will be able to resist longer which will create faster turn speeds and better pitch recognition.
Bradke is considered “neutral” in the lower quarter rotation test. He generated 50 degrees of left internal hip rotation and 50 degrees externally. He produced 50 degrees of right internal hip rotation and 50 externally. Bradke was able to balance on his right leg for 15 seconds and 15 seconds on his left which is well within expectation. Bradke was within expectation in the glute bridge test. However, he showed slight core instability.
Bradke had adequate range of motion externally in both shoulders and he passed the internal shoulder screen on both sides. Bradke passed the the lat-length/ shoulder flexion test. During the reach, roll, and lift test, Bradke was able to lift and hold both arms for the desired time frame. However, both arms began to shake around the 5 second mark. Once he stabilizes the muscles underneath his shoulder blade he will be able to control his load which will help with consistency. This circles back to getting fingers underneath his scapula. Again, this should be a primary focus in his routine. He passed all cervical and wrist screens.
Force Plate Swings
Below is video of the swing analysis. I will walk you through this matched up with video.
Bradke produced 111%-115% BW into the ground and loaded into his the ball of his foot. Loading into the ball/ toes will spike back leg force and cause back-leg force to decrease significantly as he advances forward; meaning he pushes away from the catcher rather than pushing directly into the ground. Ideally, we would like to see him maintain BW as long as possible in his back leg. His front leg metric is below expectation at 141%. Ideally, we want to see him create it faster, meaning a more violent interaction with the ground. The faster his front leg interacts with the ground, the faster the energy will be sent up the chain. On his back-leg Bradke produced 48 Newtons and produced 147 on the front which is within expectation. His x-axis timing, a metric used for adjustability, ranged from 60-73%. Ideally, we want this metric to be around 80%. He needs to load into the heel and turn into the ground more forcefully. Once he makes the adjustment, he will be able to delay his swing decision and see the ball longer.
KVEST Sequencing & Rotational Speeds
The 3d readings are on kinematic sequencing and rotational speeds.
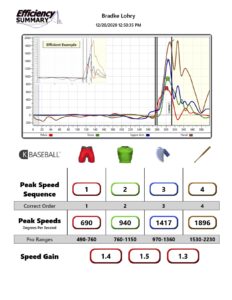
Bradke demonstrated good swing sequencing. His hips, torso, lead arm and bat were all in sequence. However, on most swings he showed a double spike on the graph (brown line) which results in losing his wrist hinge early. This is caused by over-gripping the bat or dumping his barrel behind him. Ideally, we want to see Bradke turn the barrel towards the pitcher vs. losing his hinge towards the catcher. His hip speeds are at expectation near 690 deg/sec. Torso speeds are average at 940 deg/sec. The lead arm gets good gain at 1417deg/sec and the overall rotational speed is 1896 deg/sec. Once Bradke learns to keep his wrist hinge, he will see faster overall rotational speed.
Bat Sensor Data
Bradke’s bat speeds are above average average for his age, ranging from 72-75mph. His attack angles were lower than we would like, ranging from -3 to 7 degrees. Ideally, attack angles range from 8-12 degrees. His rotational acceleration numbers were at expectation ranging from 15-17 G’s. This shows how closely he is turning to his body, which will result in speed gains. His time to contact is good at nearly 150ms. Vertical bat angles vary based off of pitch location and he ranged from -30 to -35 degrees. This indicates he loses posture early which will affect his path.
Movement Prep
Hinge/Counter Move
- 2 knee anchored hip hinge – start on two knees. Keep spine in neutral position. Hinge from hips as the hip goes rearward towards heels.
- 1 knee anchored (rear knee) lead leg extended hip hinge – start on rear knee w/lead leg extended sideways. Keep spine in neutral position. Hinge from hips as the hip goes rearward towards heel.
- Banded rear hip 1 knee hip hinge – start on rear knee w/lead leg extended (banded rear hip -belt). Keep spine in neutral position. Hinge from hips as the hip goes rearward towards heel.
- Standing kettlebell half squats – front rack a kettlebell and squat from a neutral spine position.
- Standing kettlebell on leg half squat – front rack a kettle bell and squat on rear leg from a neutral spine position.
- One leg kettlebell jump – start with kettlebell front racked. Starting on back leg, jump off one leg, land and support weight with a neutral spine position.
- Standing hinge/counter – from hitting position hinge & counter turn hips. Match shoulder counter turn to hip counter turn. Use a PVC on shoulders if necessary.
- Standing advance hinge/counter w/slide disc – from stance (lead foot on slide disc) slide front foot out as the hips hinge and counter turn. Can use PVC on shoulders if necessary.
- Standing advance hinge/counter – from stance advance into stride as the hips hinge and counter turn. Can use PVC on shoulders if necessary.
Pelvic Tilt
- Sit-up position posterior tilt – start in sit-up position with your hand under your lower back. There will be a natural tilt of the pelvis into anterior position. From here begin the sit-up while trying to feel your lumbar spine press firmly into your hand. Once you feel this sensation you will return to original position. Next try to create the same sensation with out raising your shoulders or hips off the ground.
- Hands and knees anterior/posterior tilt – start on hands and knees (knees under hips). Create anterior and posterior tilt using as little thoracic movement as possible.
- Hands and knees single arm anterior/posterior tilt – start on hands and knees (knees under hips) and bring one hand to your chest. Create anterior and posterior tilt using as little thoracic movement as possible. Repeat with the opposite hand on chest.
- Standing hands on knees anterior/posterior tilt – start with hands on knees (athletic position). Create anterior and posterior tilt with as little thoracic movement as possible.
- Standing single arm anterior/posterior tilt – start with one hand on a knee and the other on your chest (athletic position). Create anterior and posterior tilt with as little thoracic movement as possible. Repeat with opposite hand placement.
- Dead bug progression – start on back with knees and hips bent at 90 degrees (you should feel your entire spine connected to the ground – if not bend slightly more from the hips). Elevate arms so the wrists and elbows are directly above the shoulder (towards the sky). Extend one leg away without the spine coming off the ground (the pelvis will want to go anterior and lift the lumbar spine). Reset and repeat with the other leg. There are many variations available to add after complete mastery of this movement.
Disassociation
- Rack or Open doorway assisted pelvic disassociation – place hands/forearms against anchored frame (keep shoulder line inside of frame). Rotate pelvis/hips w/out moving shoulders.
- Partner assisted pelvic disassociation – have a partner support your shoulders. Rotate pelvis/hips w/out moving shoulders. Repeat from multiple postures (from high pitch to low pitch).
- Partner assisted counter turn pelvic disassociation – have a partner turn your shoulders into counter rotation. Resist the rotation and rotate pelvis/hips while resisting the counter turn. Repeat from multiple postures.
- Self resisted pelvic disassociation – start with a PVC on the shoulders for reference. Keep the PVC stabile while rotating pelvis/hips. Repeat from multiple postures.
- Single leg 90 degrees internal hop pelvic disassociation – Start on back leg with front leg elevated. Hop on back foot, while in the air rotate the leg/foot 90 degrees internally, then land. Hop again and return the back leg/foot to initial starting position. Use PVC on shoulders for reference.
- Banded hip & wrist pelvic disassociation – Attach band to rear hip (belted) and j-band to rear wrist. Have anchor points facing the chest direction. Go from stance to counter move and advance. Rotate pelvis/hips while maintaining scapular resistance (j-band tension). Repeat from multiple postures.
- Rear hip pinch hold pelvic disassociation – hold an object in the rear hip (in the hinge/counter move position). Rotate the pelvis/hips while keeping the object in the hinge.
Rotary Instability – Anti-Rotation/Deceleration
- Push-up position single shoulder touches – start in push-up position, use one hand to touch opposite shoulder. Make sure spine stays flat in a neutral position. Repeat with the opposite hand.
- Push up position since arm pull throughs – start in push up position with a weight just outside body frame (even with rib cage). Grab the weight with the opposite hand and pull under the body to the opposite side. Keep spine flat and neutral (can put a ball or PVC on back to ensure no movement). Repeat pulling back the opposite direction.
- Standing sideways band resisted isometric holds – start with band anchored off to the side of the body. Take bands and hold them even with the chest, press away from chest, hold for 15 seconds. You can vary resistance of bands and add band interference as needed. Repeat opposite direction.
- Standing offset band resisted isometric holds – start with band anchored off to the side of the body. Disassociate the torso at least 30 degrees from the pelvis/hips. Hold bands even with the chest, press away from chest, hold for 15 seconds. You can vary resistance and add band interference as needed. Repeat opposite direction.
- Standing eccentric/concentric band resisted turns – start with band anchored off to the side of the body. Hold band even with the chest, press away from chest, rotate away from anchor point (quickly), return back to center (slowly – 10 count). Repeat opposite direction.
- Partner assisted counter move resistance – start from launch position. Have partner rotate shoulders in the counter turn direction, resist the turn (5 second holds). Repeat from multiple postures.
- Partner assisted finish resistance – start at the follow through portion of the swing. Have partner rotate shoulders in the direction of the finish, resist the turn (5 second holds). Repeat from multiple finishing postures.
- Counter turn medicine ball catches – start in counter turn position. Have a partner throw a medicine ball off the backside of the counter turn position. Catch the ball and stabilize without continuing into counter turn. The ball weight, speed, or distance away from the body can be adjusted as needed. Repeat in multiple postures.
- Swing finish medicine ball catches – start at finish of swing. Have a partner throw a medicine ball off your finish side, catch and stabilize the ball without continuing further into finish. The ball weight, speed, and distance away from the body can be adjusted as needed. Repeat in multiple finishing postures.
- Counter turn medicine ball catch and throw – start in stance, catch ball going into counter turn, and throw back in swing posture. Throw from multiple swing postures and throw in different direction of follow through (opposite field, center field, pull side). Hold finish in the direction of the throw for deceleration work.
Scapular Resistance
- J-band reverse fly’s – attach j-bands to both wrists. Start with anchor point facing the chest. Pull arms rearward by retracting the scapulas together. Maintain a neutral spine position. Hold at the retracted position for a 5 count and then return to the front (5 count coming forward as well – as the scapulas slowly move away from the spine and work off the rib cage.
- J-band bent arm pulls – attach j-bands to both wrists. Start with anchor point facing chest. Arms start bent at 90 degrees. Pull the elbows rearward as you retract the scapulas towards the spine. Maintain a neutral spine position. Return back to 90 degree position. Repeat as you change anchor point height and adjust posture accordingly.
- Single arm j-band arm pull – attach j-band to the back side wrist. Start with anchor point facing chest. Arm starts at 90 degrees. Pull elbow rearward while lead arm stays relaxed. Keep rib cage as stabile as possible. Return back to starting point. Repeat as you change anchor point and adjust posture accordingly.
- Single arm j-band body turn – attach j-band to the back side wrist. Hold arm at 90 degrees. Rotate body in the normal swing direction. Make sure the wrist doesn’t move as the scapula is retracted by the turn of the torso. Return back to starting point. Repeat as you change anchor point and adjust posture accordingly.
- Single arm, j-band back resisted turn – attach j-band to wrist. Anchor point will be off the side of the body (back shoulder). Start with arm at 90 degrees. Turn torso away from anchor while resisting wrist movement away from body (supination is fine). You may feel external shoulder rotation. Repeat as you change anchor point and adjust posture accordingly.
- Bar resisted turns – attach bands to the end of a clipped bar. Anchor point will be off the side of the body (back shoulder). Start in hitting position with one hand on upper and lower part of bar. Resisted top clip of the bar. Turn torso in the swing direction. Resist wrist movement. You will also feel external shoulder rotation (think the bar is turning to perpendicular to spine. Repeat as you change anchor point and adjust posture accordingly.
Swing Prep
X-Axis Timing (heel pressure)
- One leg kettlebell squat – start on back foot with kettle bell front racked. Squat with normal pattern with emphasis on feeling heel centric load.
- One leg kettlebell jump squat – start on back foot with kettle bell front racked. Squat with normal pattern and then jump off the ground. Stabilize with a soft landing as you go back into squatting position. Feel the heel impact and create pressure against the ground.
- Back foot disc anchors – start with a disc under the ball of the foot of the rear shoe. Heel of the rear shoe should be anchored to the ground. Stride away from the back foot while keeping it anchored in the ground.
- Both feet disc anchors – start with both balls of feet on the slide disc. The heel of both feet should be off the discs. Stride forward by sliding the lead slide disc forward (you should be on the ball of foot only. The rear shoe will stay anchored in the heel and the lead side will slide free. As you get to end of stride length begin to turn the pelvis/hips. The lead foot should now anchor the heel which will stop the slide forward. Back side will likely spin or kickback off of disc.
- No feet neutral stance full swing – start in neutral launch position. No additional stride, slight counter turn and then swing. Feet stay anchored throughout the swing (back foot may slide rearward but stay flat on ground). Repeat to different postures (pitch heights) and directionality (opposite field, center, pull side).
- Normal stance/stride no feet full swing – start in normal stance and take normal stride. Go right into swing without the feet coming off the ground (back foot may slide rearward, but stays on the ground). Repeat to different postures (pitch heights) and directionality (opposite field, center, pull side).
- Banded resistance swings – banded resistance to the lead hip (belt). Normal swings with thought of resisting the band from pulling you forward in the turn. Band resistance can be altered as necessary. Repeat to different postures (pitch heights) and directionality (opposite field, center, pull side).
 PRIVATE LESSONS
 CLASSES
 CAMPS
CAMPS ELITE TEAMS
 ELITE BASEBALL TV
 VIDEO ANALYSIS
 BIOTECH CAGE
 SHOWCASE